Search This Blog

Showing posts with label Armada. Show all posts

Friday, August 11, 2017

Star Wars Armada Quad Victory List

I've been playing a little more Star Wars Armada lately.  It's the game that one of my regular gaming groups has more or less fixated on, so it behooves me to take it a little more seriously...  or to at least play it more.  My plan is to make lists that I like, but that aren't necessarily meta winning.

My first list is a four Victory Star Destroyer list.  Three of the Vics are II-class and the last is I-class.  The fleet is led my Admiral Konstantine, an upgrade that allows me to change opponent ship speeds up or down one at the start of each round if they're within long range of at least two of my ships...  which should be easy to achieve with four pretty chunky ships.


The three II-class ships are equipped as such...


The idea is to pop Disposable Capacitors as soon as possible for a long range, 6 die shot.  The Dual Turbolaser Turrets give me a little bit of a reroll.  The Veteran Captain is there to pad me out to 400 points and give me a nav or engineering token when I need it.  I'm counting on second player for this list, so I might as well go to 400 points.

The last ship is equipped as such...


The idea here is to have this ship swoop in late game and drop 9 dice out the front and maybe another 3 out the side.  Spinal Armament also allows me to threaten out the rear if I need to.  Konstantine will ride in this ship.

I did get to play a game with this list and did pretty well.  I played against my buddy Troy, who is generally a much better player than I am.  We played the Contested Outpost mission, which netted me 100 points.  I ended up winning 8-3.

I'll be going to the North American Championship at Gencon later this month.  I think this is the list that I'm going to be flying.  I'll be absolutely crushed by anything with a lot of bombers, but I think I'll do ok against everything else.  Time will tell.  In either case, I'll be flying a list that I like to fly.


Friday, June 16, 2017

I'm Back!

...and I actually painted something.

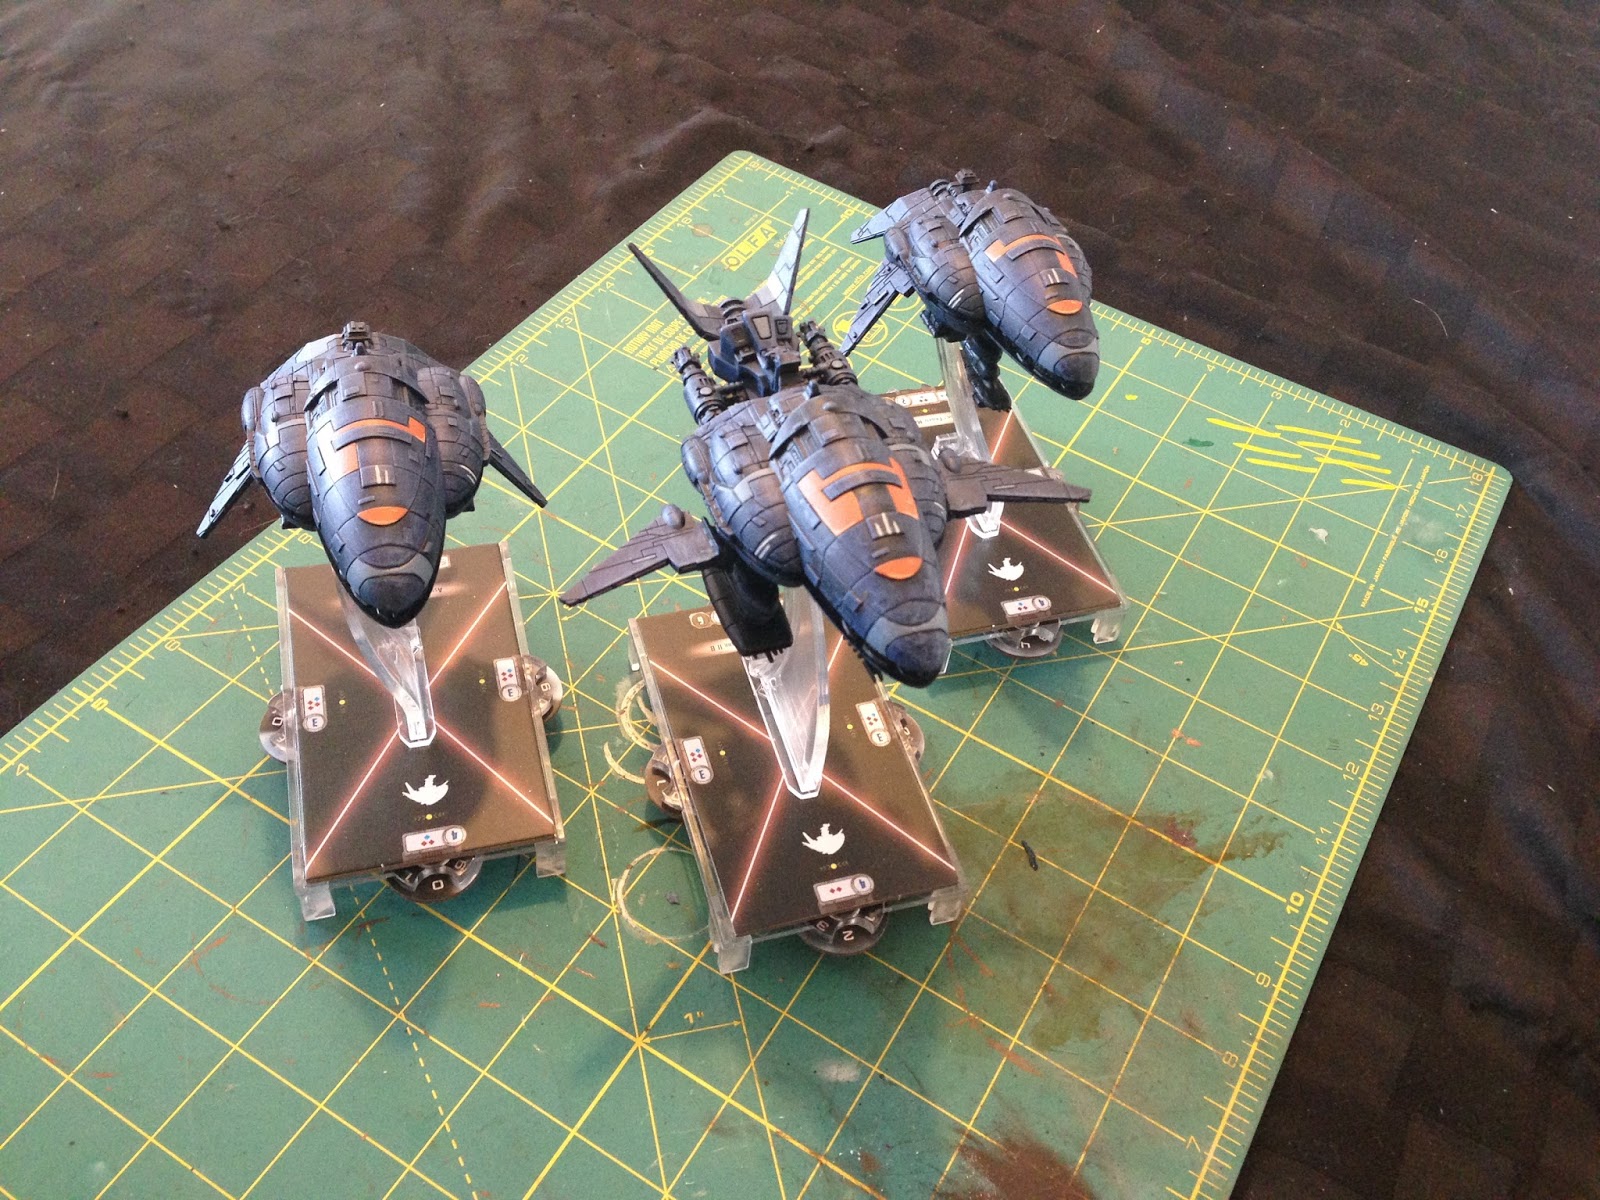
I have a Star Wars Armada Store Championship to go to in Bel Air, MD this weekend.  I'm going to be using a list made up of an Imperial Class Star Destroyer and two basic Arquitens ships.  I primed the Arqs last night and slapped a little paint on them after work last night.  The scheme is stupid easy, but I like how it's kind of menacing.


Wednesday, May 31, 2017

Armada Q2 Kit Event Results

This will be a relatively short post.  Over the weekend, my friend talked me into playing in a Star Wars Armada event.  There were only four participants, so it went pretty quick.  I had my buddy make a list for me and explain how to fly it.

Shockingly, I came in second place.  I would have come in first, but my buddy absolutely crushed a guy last round and took top place.

We got pretty cool official acrylic round counters as prizes, along with some alt artwork cards.  I might end up playing in another couple of tournaments this summer.


Wednesday, January 4, 2017

Star Wars Armada - Assault Frigate Conversion is Painted

I decided to go with the pretty straightforward "bunch of dry brushing plus a little detail work" thing.  That  tends to work well with things you're seeing from really far away...  like a spaceship.  

I intended for the orange to be like a transparent/glassy viewport sort of thing.  These are Mon Calamari ships and I think it makes sense that they'd want to be able to see out into space from all over the ship.  I'm happy with the result.  The two identical ships are painted as mirror images of each other so that they'll look good flanking the flagship.


I think it's easiest to see the orange in this last pic.  They look better in real life with better lighting.  I tried to put them into my photo box, but it didn't work.  The bases make them so tall that I couldn't get a good shot.


Tuesday, January 3, 2017

Star Wars Armada - Assault Frigate Conversion

My friends and I are going to be playing through the recently released Correllian Conflict campaign.  It looks like I'll be playing on the Rebels side of things.  Given that I'm bad at the game, and I mean REALLY BAD, I've asked my buddy to help me learn to play a little better.  He suggested that I stick with three Assault Frigates, or "Guppies" as they're commonly known.  Sounds like they're pretty easy to learn how to fly.  I'll probably go with three Guppies and some supporting squadrons to start out.

I decided to sit down and do a little hobby work to differentiate one of the ships to make it into a flagship.  I'm pretty happy with the results.  I'll end up painting them and throwing some pics up in a day or two.


Same ship, but enough of a different look to differentiate it.  I think it'll look better when it gets painted.


Thursday, December 29, 2016

Star Wars Armada New Releases

So, I just picked up this stuff...


I haven't had a chance to really go through it much, but I do have some initial impressions.  The Cruiser and Squadrons are pretty much what you'd expect.  They got Star Wars looking ships, cards, tokens.  Pretty standard FFG stuff.

The campaign box was a little more perplexing.  It comes with a bunch of cards that give us new squadron configurations for existing models as well as a bunch of new missions.  I think everyone is going to be excited about that.  The actual campaign bit is a little different.  The campaign map is just a folded up sheet of paper.  Where I would normally expect to see Rebel and Imperial tokens to denote control of planetary systems, I instead found stickers.  That's right.  This appears to be a "one and done" type of product.  The campaign elements aren't really reusable.  It's weird.  I think it's still worth the $30, but it's not what I've come to expect from FFG.  Then again, a proper campaign with card stock boards and tons of tokens would have cost more.  I can understand why FFG went this route.

Tuesday, July 26, 2016

Star Wars Armada Tactica - Dangerous Territory


Dangerous Territory 


This objective can be a blank card. Both players control the same number of objective tokens. All the tokens are with the same number of points. Sure your opponent will take some damage by going over the obstacles, but nothing an engineering order or two won’t fix. In the end the typical result is a points push, and no net benefit to you.

So, why take this objective? Why even bother to talk about it?

Because if you’re willing to play with a go big or go home mindset, then you can really make your opponent’s life miserable. This objective forces players to suffer damage and take specific orders on turns one and two to mitigate that damage. Most players plan their first and second turns as token gathering and positioning turns, so forcing them out of their routine can help throw them off balance for the duration of the battle.

Lets look at the battle strategies that can turn this Plain Jane into a Betty Bruiser.
1) As second player, you want to take the station and place it on your side of the board.
2) Take the debris fields. The face up damage cards dealt by asteroids are a lot more punishing, and they cardboard pieces themselves are a lot smaller. This will help you predict where your opponent’s ships will be for one of the below strategies.
3) Remember you can overlap multiple obstacles and claim multiple tokens each turn. So, if you’re using this objective with a large base ship you have a lot of options.


Bumper Cars


The old corvette spam can ruin your opponent’s day with this objective. (Remember Flotillas don’t inflict damage onto ships they bump.) You just have to get into position so they keep landing on the obstacle. The damage from the obstacle along with the damage from repeatedly ramming you will slowly reduce them to space dust. I like the tactic best with Tarkin and Raiders/Gladiators because you can spam engineering orders to reduce the amount of damage cards on your opponent’s ships. The Raider’s front arc is well suited for the constant bombardment, and you can up the damage by giving each ship Ordnance Experts and Expanded Launchers. The downside is if you’re facing an ISD list, you’re fighting a losing battle. The ISD will destroy a Raider in a turn or two and most likely shrug off the damage.

The Rebels can do well with Rieekan zombies list here using the same parking lot strategy.

Fighter Balls


The objectives need to be far enough into the table to give you time to push your fighters against their wounded fleet. Fighter balls vary quite a bit these days, but even a modest fighter force can be fatal in this situation simply by forcing the opponent to play wounded. Most players will stack engineering orders to heal up, which leaves them without the navigation orders they may need to outmaneuver your onslaught. While taking one face up damage card is rough, watching Luke bomb damage onto the weakened hull is terrifying. Even medium base ships like Gups have to worry after a few damage cards that one good shot from an ISD or Home One could end their game much earlier than they planned.

Blitz


If you like ISDs or MC30c and high-risk high-reward game play, you can scare the piss out of most opponents. The idea here is to engage them fast and hard with a lot of dice, similar to the sort of craziness brought on by CloneTrooper’s list in the Vassal tournament. Rather than playing bumper cars, you’re looking to swoop in on a target that isn’t ready for the battle and pile on the damage.

Victories for Victory


Victories work well with the objective if flown correctly. Your opponent has to telegraph their starting locations and general flight plan, which allows you to place your VSDs with more confidence that they’ll see battle. It’s still risky with those lovable lumberers, but it’s a much easier way to make it work.

There aren’t a ton of must takes with this list. In terms of upgrades, Engine Techs can help you get into position to keep your opponent’s ships on those obstacles. Tractor Beams can help further disrupt your opponent’s overall plans and keep them stuck on an asteroid for one more turn. If you’re a Rebel player, Luke makes even more of an impact than normal on this objective as low hull ships might die without losing a single shield.

Finally, there are a few obvious choices for commanders that compliment this objective: Ackbar for the increased attack, Dodonna to help choose the most devastating crit, and Rieekan or Motti to soak hull damage.

I hope this was somewhat helpful and informative. Until next time—She’s Got Admiral Ackbar Eyes.

Tuesday, July 19, 2016

Star Wars Armada Tactica - Opening Salvo


Opening Salvo 


At the end of the wave two meta, this card is basically blank as no opponent with an ISD or an MC80 will rationally consider taking it. The exposure is too great for them. But lets assume they have a plan and you have a plan for this double edged sword (just like we discussed in Advanced Gunnery). How do you make sure your plan is better?

Lets start with some serious recommendation about list building around this objective.
1) Never take with less than three ships. You need at least the average number of ships in a list to secure the tactical advantage. So anything less than three means you’re giving dice that you’re not getting from the average opponent.
2) Never take with a large base ship(s) in your build. This objective is a giant screw you to big ships. Half of an ISD is a Gladiator. Half of an MC80 is a Nebulon B. You want to minimize your own risk while maximizing your opponent’s risk. In this case that means not taking large base ships.
3) Be aware that a spam list will give you lots of dice, but might get your little ships killed much quicker. A lot of Mon Motha and GRRRR players favor this list because they get a lot of extra dice without offering up much in the way of points. And they’re right. It’s a great choice for them. However, what few of them consider are the now devastating first punches at long range coming off of an Ackbar infused Assault Frigate MkII. Yes, you get two black dice, but you’re now taking seven dice that are more than likely enhanced by a turbolaser. To the average Raider or CR90, that’s a one shot kill on turn two. So, if you’re thinking about taking it with a spam list make sure you can withstand the casualties you’re likely to suffer.
4) I don’t see it a lot but this objective works great on fighter centric lists with cheaper ship support (any list with 100+ points of fighters and no single ship costing over 100 points). You again minimize your own risk while maximizing your opponent’s risk. But you’re also making your fireball or Luke Skywalker more valuable as they only have to land on shot to rack up the points.
5) In my opinion, this objective works best on lists with four ships, no large bases, and a lot of navigation orders.

Now that you’ve had a moment to consider your list lets talk about the plan you’re going to execute with it.

Your real goal is to hold your first shot until a solid (if not optimal) opportunity presents itself while denying the first shot to your opponent. Even if you have your opponent severely overmatched, this is the one objective that penalizes you for simply trading shots. It’s better to wait and take minor pokes onto your shields then go in for the kill.

To that end, you’re going to need to stack navigation orders or take the navigation officer upgrade card to keep maintain positioning on your opponent’s ships (them in your primary arc and you not in their primary arc).

Your second goal is to put one damage card on each ship. Killing ships is awesome. The idea of blowing up an ISD is what gets me out of bed some mornings. But it’s half the fleet cost, including upgrades. This is where Luke or blobs of fighter mines (as Fire When Ready calls them) can earn more points than ever before. A shoestring of three A-Wings can plink away at an incoming ship and earn their collective points costs back in a single turn.

Upgrades You Should Take 

X17 OR Heavy Turbolaser Turrets 

One of these is a must take for this objective on every ship in your fleet. They are interchangeable on this list because you don’t care at all about how the damage card gets there as long as it’s there. So restricting the overall defense is what’s important. When you do the math, there is approximately a one point variable between specific ships depending on their shield structure.


Engineering Captains 

If you have the points this isn’t a bad idea. After all, denying an opponent 20-60 points at the last moment on a mildly damaged ship could win you the game or run up your margin of victory.


Engine Techs 

If you have the points, take them. They can help move you out of or into a bad arc. They can make sure you don’t get rammed on turn six and take damage card that costs you the game. They can in short be the difference between victory or defeat for this objective.


Upgrades You Should Avoid 

Intel Officers 

This card is good at killing but not so great at wounding ships. Yes, they lost a brace or whatever, but they still had it when they needed to keep the cards off their hull.


Veteran Captain

This card is normally pitched as a cheaper version engineering captains or similar officer slot. But that’s not true here where your most important order effects will be discarding damage cards and gaining a bit of extra yaw.

Support Officer/Nav Team

No, they don’t do the same thing, but they fill the same role: recovering from bad decision making (or compensating from an unforeseen event). These are cards you take to help you along in a pinch. My advice for this objective is to take them early on in your list building/play testing process (I always do).


Commanders

Ackbar

This choice doesn’t need any real help. And adding two dice to another two dice mixed with a normal broadside isn’t math, it’s murder. For example, on an MC30c Scout Frigate with Ackbar, this makes your first shot at long range a six or seven die murder fest. Not bad for a 69 point crap bucket  with weird dice and no brace token.

Vadar 

The re-roll effect is nice and very useful if you’re planning on throw a lot of red and black dice. Vadar lets you gamble harder and invest bigger than most other commanders. That said, you have all the standard draw backs of a Vadar list to consider.


Tarkin 

He lets you take a Defense Liaison with confidence. He gives you a re-roll for your big first shot. He does it all and more because he’s a Grand Moff. He gives you a nice amount of flexibility with this objective while still providing all the benefits he did before.

I hope this was somewhat helpful and informative. Until next time—She’s Got Admiral Ackbar Eyes.

Tuesday, July 12, 2016

Star Wars Armada Tactica - Minefields


Minefields

I’m going to go through each of the mission objectives one at a time. So, 12 articles in total that won’t be done quickly. I’m going to shoot for one per month. If they come quicker great. In each of these posts, the reader is player two and the opponent is player one.

Lets start with Minefields, which is far and away the most useful of the objectives because it fits well into any list and gives the second player an intense amount of board control. The misconception that Minefields gives a lot of players is “fitting into their list.” While that mentality is true for most of the other objectives, in the case of Minefields, the question should be what can I take from my opponent. Minefields is flexible and allows you to use it in response to any list by both causing damage and fiddling with position. While this approach does require some guess work, it’s not hard to deduce that a Rebel Ackbar list would like to move in a way that allows them to keep you in their side arc.

When you deploy the obstacles and mines for this mission, there are three basic strategies to consider.


Trap the Middle


Putting a lot of damage into the middle (or one side) of the board and forcing an opponent to go around or through.This works best if you are playing a rebel list that likes to move in swirl or C shaped pattern and your opponent is not.

The idea here is to create a wall of damage and misery for your opponent to cross over in order to fight you. This is especially good against the Empire who want to keep you in their front arc or against squadron heavy lists that require activation to be effective. Additionally, this strategy completely screws the Demolisher Title’s effectiveness as two mines can kill a Gladiator on a bad role.


Crowd Their Deployment Zone

Good against most lists and a solid default, but excellent against CR-90 and other small ship spam lists. The goal is simple: put all the mines in or just outside of your opponent’s deployment zone. The mines and obstacles will hopefully damage or even destroy a few ships before turn two.


End Zones

Similar to trap the middle, but used to exclude both sides of the board outside of the deployment area. This is great if you play a list dependent on forward arcs and your opponent does not.

Done properly this deployment will allow your Victory Class Star Destroyers to wreak havoc on Admiral Ackbar and company.


Support Your Minefield


Now comes the tricky part, support your minefield, but don’t get blown up. If you place all those obstacles and objective markers perfectly, but don’t fly close enough to shoot an opponent who has just detonate a mine or two or (if you’re really lucky) three, then you’ve wasted the opportunity presented by the objective. While it is annoying to your opponent to have to spend their command dials and/or tokens on engineering, it is something they can plan for.

So, what do you do? Make the terms of the engagement cost your opponent more resources than yourself by maintaining pressure on their ships and squadrons while the terrain does the extra work for you. Follow these guidelines:

Plan to be in your ship’s preferred range the turn your opponent hits the minefield. Ideally, you’re opponent will think you’re going to hit the mine. They may slow down or alter course to capitalize on their perceived advantage, but a navigation command or token will allow you to slow down or turn away at the last second. This is generally enough to trick an opponent into flying straight into the mine.

Make sure your activation economy is favorable. You’re going to be player two, make sure your opponent as to activate a ship that will clear the mines out of your way. If you’re are playing with less activations, then play defensively. Let them it the wall first and suffer the damage even if you don’t engage until turn three or even four.

Send your squadrons though to soften up the targets even more. Whether it’s rogues, TIE fighters or A-Wings, ordering them through the danger zone without penally to strip off some shields, harass your opponent, and encourage them to engage you on your terms is very helpful for this mission. Remember this game is about ships; all squadrons are ultimately pawn sacrifices.

Commanders


No one commander is best suited to this mission. But a handful offer a better advantage than their counterparts.

My favorite commander with this mission is Tarkin (though I’ll say that a lot) in this mission he lets you take the concentrate fire command AND the navigation token at the same time. Slowing your ships just outside of the minefield’s range while weakening your opponent’s ships as they sail to glory.

Ozzel lets you pull of some swanky and annoying feints with this mission. The only problem is your opponent might see it coming. So, be prepared to have a follow up tactical decision should your first maneuvering trick fails.

Motti offers a solid choice as your can afford the hull damage (even on smaller ships) to use the minefields as a surprise. Most players will not seriously consider the idea that an opponent with simply roll through the minefields, tank the damage, and consequently catch them out of position.

Dodonna is the best choice for the Rebels as the increase chance of the right face up damage card at the right moment are improved by dealing out some much punishment.

Ackbar is well Ackbar. He’s my overall favorite, and the guy that let me win a lot early on. While minefields doesn’t specifically give him and edge, he’s always a great choice.

I hope this was somewhat helpful and informative. Until next time—She’s Got Admiral Ackbar Eyes.

Tuesday, July 5, 2016

Star Wars Armada Fleet Commander Contest

FROM THE BEARD OF DOOM


The window on the FFG Star Wars Armada Fleet Commander Contest closes today. I haven’t submitted my list, because I can’t decide which list I like best. The contest has sent me into a frenzy of list building exercises. The next two waves are going to rock the game to its core in the best possible way.


Wave 3 will introduce the flotillas sooner rather than later. But Wave 4 isn’t out for another sixths months. If you haven’t seen the Wave 4 ships, they are the Interdictor and the Liberty. Very smartly, FFG decided to preview the ships and upgrades. While the mystery and dream phase of the release may be over and gone, the much more interesting “Wow, it can do what?” phase has begun. The contest is designed to make everyone consider what options the next two waves can bring to various strategies and tactics.


As I see there are three major shifts upfront.

1) Flotillas will obviously change squadron activation options for both sides of the Galactic Civil War, but they also offer an interesting no squadron option. This tactic works best for Rebels because they have the 18 flotilla, however, either side could easily mass three or four flotillas and use them for anti-squadron fire. The weight of constant dice might be more than most squadrons can handle.

2) The Rebels need to fly even better. The Rebellion’s front arc is a nice addition because they give the Rebels another bruiser without compounding the Ackbar issues. It also makes the Nebulon-B a more plausible option without a title. For some this feels like a departure from the Rebellion’s general flavor. I disagree. The Liberty and next two Commanders offer the Rebellion more interesting movement focused options. The fleet already about going fast and juking around big front arcs will now add pointing a big front arc to their list. It’s going to be tricky to balance a mindset that can move side and front arcs together effectively. It’s going to be interesting to see how Rebel players respond to the new dynamic later this year.

3) Finally we come to my favorite: control Imperial. The empire is going to have an alarming amount of bullying tactics to chose from, most notably deciding their opponent’s speeds. The Empire will be lining up their best kill shots on ships they can actively stop from moving or limit their movement. This is tactic I’m most excited for, but most concerned about in terms of sportsmanship. After all “Mother May I” might be a fun thing to play but might not be a fun thing to play against. So, we’ll have to wait and see how well these upgrades and options are balanced this fall.

I’ve been swept up in the Warmachine and Hordes Mark 3 release, so I haven’t had time to test these ideas yet, but I’m excited to see what they can do. But Vassal looks more exciting by the day.

I hope this was fun to read as well as somewhat helpful and informative. Until next time—She’s Got Admiral Ackbar Eyes.

Tuesday, June 21, 2016

What to Expect when You're Expecting Part 2

FROM THE PEN OF THE BEARD OF DOOM...


Now that the cards have been leaked and Flotillas are coming to Armada in the next few weeks, I feel like a man at the end of a chapter in his life. My Ackbar army list, which has finished sixth at the Pittsburgh Regionals, sixth at the New York Regionals, and Eighth at the West Virginia Regionals [plus 3rd at Nationals? -Kris], will cease to be relevant the minute flotillas hit the shelves. The list has been the focus of my tabletop life for sixth months, and I’m loath to say goodbye.
I come from games with longer life cycles, so I’m used to an army lasting a year or more. I feel like the Ackbar list, despite all the tournament play, is still young and in its prime. I should have six or more months to enjoy it. Instead I have a few weeks.

That said, flotillas will usher in a new era of strategy for Armada, because they will increase the activation count and alter both the lifespan of larger ships and how squadrons are used. The average activations per list will rise by at least one, and I think most lists will have five. However the biggest difference comes from the flotillas’ flexibility, which prevent players from using corvettes as blank cards. Right now, most high activation lists (4+) activations tend to have one activation that does nothing (other than make your opponent go twice). Now, I feel like those activations will allow a player to gain more of an advantage through buffs or tend squadrons.
Furthermore flotillas will make all players take squadrons seriously. As it stands players generally have a list that gives squadron commands or a pile of squadrons floating in space to act as a meat shield. I’m the latter. My squadrons die to a man in almost every game. Now, those poor doomed bastards will have a chance to do something on their way through the game. I find that idea super exciting. It’ll be nice to give my A-Wings and X-Wings something to do other than die screaming while my ships attack other ships.
This newfound respect for squadrons comes from the clear synergy of using two flotillas to up the activation count of the list while letting them run the four squadrons already on my list. No upgrades required, and my list is instantly more effective. Obviously, this is just my jumping off point, but it’s still nice to have an idea of where I’m starting and how many flotillas I’ll need to do so.

I hope this was somewhat helpful and informative. Until next time—She’s Got Admiral Ackbar Eyes.

Tuesday, June 7, 2016

Star Wars Armada - Intel Sweep Tactica

 I love this objective for it’s sheer arrogance. It’s hands down the most telegraphed and ballsy objective in the game.

When you put this on your list you send a very clear: We both know what I’m going to do. I know you can’t stop me, but it’ll be fun to watch you try. If that isn’t your exact logic when you take this list, you’re doing it wrong and need to take it out of your list. Because this objective requires you to have a plan and expose that plan to your opponent. Additionally, most people won’t pick this objective unless they think they have a reasonable counter. So, from out of the gate this objective is both a race and a con job.

The nice part about this objective is it blends well into any general strategy. You really should have a general idea of where you want your fleet to go before the game starts, so you can put your objectives along that line. Additionally, the token furthest away from your objective ship is the one your opponent needs to race towards, unless they decide to make a play for your objective ship. Plus, your opponent can’t really ignore you because of the 75 points awarded from claiming the most objectives.

The way I play the objective is simple because Rebels, especially Ackbar, like to travel in a very standard swirl pattern. I like to put my objective ship in the middle with two ships flanking it (two gups work, I prefer one gup and one MC30). The flankers are normally set back more towards the board edge by one or two. I do this for two reasons: one it guards against the bumper cars; two, it means the objective ship can’t be flanked without a high price being played. To that I add my squadrons either near and around the objective ship. Most counter to this mission involve killing the objective ship, plopping a bunch of rogue fighters around it is a pretty good deterrent.

Really you should start by testing this objective with your current play style. Set the tokens along your normal flight path and see how it goes. It’s easy to adjust and tweak this mission, so find a decent opponent.

This list doesn’t call for any upgrades, except maybe engine techs. The piece of equipment you need to take is a ship that has speed three or four. A speed two lumberer is too slow to reliably get the three tokens you need to win.

In terms of commanders, I like Ackbar, Tarkin, and Iblis. Guys that offer you a strong offense, lots of options and enjoy sitting back. This protects your flight plan and lets your opponent sweat bullets. Motti is a good choice for a little extra hull, but like I said: as long as you have a reasonably fast ship, plan your game your way and tweak from there.

I hope this was somewhat helpful and informative. Until next time—She’s Got Admiral Ackbar Eyes.

Tuesday, May 31, 2016

Star Wars Armada - Precision Strike Tactica

Precision Strike


Only take the objective if you take at least a handful of bombers.

I know I talk a lot in the blog, or at least in this first series of posts, about having a plan to execute, and this time it’s even more important. But your plan for this objective needs to include bombers. The reasoning is as follows: if you play against a Rhymer ball or other bomber list your opponent is going
to score a lot of points. If you can’t reciprocate those points, then you’re most likely going to lose the game. And the reason is this: Precision Strike gives points on a per attack basis, with each attack being able to score twice (once for rolling a crit and once for spending a die to flip a card face up). Fighters with multiple anti-ship batteries and bomber (B-Wings, Scurrgs, Firesprays, etc.) can score 30 points a turn per fighter. Three B-Wing can yield five tokens (75 points) in a perfect round of shooting against a ship without shields. Scoff if you want to, but remember an opponent with a lot of bombers can afford to keep your Gup alive to soak up the extra points.

Therefore, even if you have fighters, make sure you feel confident in your ability to win the fighter battle should it become a ball vs. ball game. Without going into the anatomy of Rhymer balls or other bomber balls, you want to make sure you’ve got some escort or other answer to the opponent’s fighters.

I did toy with the idea of using non-bomber fighters with this objective. The idea was to have the fighters deal few cards at the end of the game turn for the ships to flip face up on the next turn. But much like other combos in Armada, it was an unwieldy mess. Plus, I frequently found myself torn between flipping the card face up and doing one more damage to the ship.

Okay, lets talk about the tokens. They’re nice, but not a good reason to take this objective. Precision Strike is a complicate objective that requires well thought out list building and solid tactics on execute to yield a points advantage. It might be the hardest objective in the game to get right. The token is attractive, but not a game changing decision.

Now, lets talk about upgrades. Not shockingly any upgrade that guarantees a face up damage card is great when playing this objective. The two that spring to mind are Assault Proton Torpedoes and Dodonna’s Pride. Yavaris is a clearly good choice if you’re playing Rebels as it can really amp up the damage.

Because my play style is ship first, I rarely worry about making specific fighter recommendations relative to the objective. But this is the objective Luke Skywalker was born to play. While black dice only have 25% chance to crit, Luke as a good chance to setup a damage card for another squadron or ship to flip over later that turn.

Finally it’s time to consider what commander you want to run with this objective. This objective pairs best with Screed. His ability guarantees several tokens a turn. At 15 points a token, well, your opponent is going to have a lot of issues compensating for all the damage, crit effects, and points.

Dodonna fits well with this objective. Though not as powerful as Screed in terms of synergy, stacking a victory token on top of the best possible crit is pretty mean. Just remember that Dodonna’s ability only affects cards dealt, so it won’t trigger when you spend a die to flip a card face up.

Iblis is out, because you’d lose a token on turn one, which takes away 17% of Garm’s benefit. And Tarkin, is still helpful, but you’re one turn closer to a use it or lose it scenario with your tokens.

Ackbar is tough because his lists tend to focus on more expensive ships and don’t leave much room for bomber runs. That said there is a case to be made for overkill. Ackbar tends to generate a lot of extra damage in the late game, and while there is a one per attack limit, scoring an extra 15 points can help push you from a 7-3 margin of victory to an 8-2. So, you can always take all your overkill and spend it turning over damage cards you dealt last turn. It’s a good way to run up the points total.

This might the only objective that makes Darth Vader a serious candidate for commander. He will let you re-roll blue dice without spending any of them, and therefore gives you a lot of safe chances to re-roll for a crit. That said, you’d have find two other objectives Darth would be good at and you’d have to 36 points. Still mediocre, but I have a soft spot for the Sith lord.

I hope this was somewhat helpful and informative. Until next time—She’s Got Admiral Ackbar Eyes.

Tuesday, May 24, 2016

Star Wars Armada - Most Wanted Tactica


Most Wanted


This objective is a little specialized, and requires you to build your list around it. If you’re running three big ships, then you should skip this objective. If your local meta is mostly small ship spam, then you should skip this objective. If you’re not sure you know every ship in the game fairly well, then you should skip this objective.

All the weight of this objective, for better or worse, falls on the second player. As a result, you can win or lose the game for yourself simply by including this objective in your list. I didn’t start playing it until after I played through three or four tournaments and felt like I had a serious handle on the game as a whole. Likewise, when wave three eventually comes out, I’ll set this objective aside for a month or so until get acquainted with the flotillas and how they fit into things.

So, now that you’ve been warned, lets talk about how amazing this objective can be in the right hands. If everything goes right under optimal conditions, this objective is worth a net of 162 points. This assumes you have a CR-90 B and your opponent as an ISD 2.

This brings me to the first advantage, you get to pick both objective ships. Your goal with this objective is to create a potentially devastating points imbalance by choosing the cheapest ship for your list and a significantly higher point cost ship from your opponent’s list. In current meta, this is fairly easy to do by running a dummy ship on your list, generally the Raider 1 or CR-90 B are optimal, but a Gladiator (without Demolisher) or Nebulon-B work almost as well. This guarantees you’ll at least be close to breaking even, should you run across a multiple small units list.

Now onto advantage two: extra dice. When either player attacks their opponent’s objective ship this can add one die of any color that is already in its attack pool. Under ideal circumstances, you want to consider what each of your ships will gain should your opponent choose this objective. Ideally, you won’t gain red dice, or you’ll have a trigger that lets you re-roll them (leading shots). It’s important to know exactly how you’ll use the extra dice, because your opponent gets the same advantage. This plays well with small ship spam or any color crit dependent list. First you get extra chances to roll the crit. But should you whiff your die roll, the extra die make the cost of effects like Screed or other die spenders less painful.

As an Ackbar player, I don’t like this objective for my favorite admiral. Red dice have a diminishing return, and I can’t run leading shots on every ship. While Home One can help, with five dice firing off the side of a Gup, there is usually a blank or two or three or five already in the mix.

Finally, the points I’ve already mentioned. If you can keep your objective ship alive great. But the extra points can outright end a tournament run for your opponent. Just make sure you choose a target you can kill. There is no point in swinging for the fence by choosing an MC80 or ISD 2 if you’re not sure you can kill it. It’s better to get an extra 72/81 points from a dead Gup than nothing at all.

I hope this was somewhat helpful and informative. Until next time—She’s Got Admiral Ackbar Eyes.

Tuesday, May 17, 2016

Star Wars Armada - Superior Positions Tactica

Superior Positions


Let me start by saying, I love this objective. The victory points are nice, as it gives you something extra to work on as a pilot. But the real advantage, from my perspective, is in deployment. The ability to force all of your opponent’s units on to the table gives you a massive opening advantage. Now, there are ways to counter this issue, as there are ways to counter all objectives. However, in my tournament experience that most players lack the raw experience to do so. It’s great for messing with your opponent’s head and really just rattling their cage from the start of the game. The ability to force all of your opponent’s units on to the table gives you a massive opening advantage.

The tokens are nice, but the real advantage here is getting to see your opponent’s entire game plan on the table and set in stone before you put a ship down. I’ll risk this list even when I know a fighter ball can overwhelm me, because I usually exploit their initial deployment enough to make up the points. It’s difficult to describe the exact tactic without a few dozen pictures, but the idea is to put your opponent to a choice (hopefully a choice between two bad options). For example, if your opponent is running the Rebel swirl go the opposite direction and attack from the rear. If your opponent splits this ships between the two sides of the board, consolidate so some of his ships are out of the fight for a few turns. I once did this against an ISD and two Gladiators. The ISD took 5 turns to enter combat against my Ackbar swirl.

There isn’t much your opponent can do to completely mitigate your advantage. If they split their forces, you can consolidate. If they concentrate their forces, you can take the best route of attack. If it’s even numbers, you can play the matchup game. This last point is especially useful if you’re trying to use a combo list (i.e. Overload Pulse and Avenger).

If you’re looking to wrack up the tokens I find there are two good options: Rogues and multiple small units (MSU). The corvettes are generally the favorite, but Demolisher is another solid obvious choice. Generally anything that moves fast and can have two clicks on its last joint will work. I’m a huge fan of the Gups, and with navigate commands, they do well with this objective. Their success is due in part to the element of surprise: no one expects you to aim the speed three whale at their rump.

My favorite list packs in the rogues. This objective rewards both Han Solo and my six YT-2400s. Yup, I’m one of the guy that looked at wave two fighters and went nuts. This objective is a nightmare when you’re trying to cover up from seven attacks a turn. At speed four there isn’t much your opponent can do to stop the 15 point tokens from piling up (my record is 14 in one game).

Commanders are super list dependent, but should be seen as an enhancement to the objective. If you’re running a bunch of bombers, then consider Dodonna. If you need some flexibility, then Tarkin or Garm are solid choices. If you’re adding a specific tactic then Ozzel, Screed or Mothma can help round things out. If you’re going for token, then the only commander I find to be difficult is Ackbar, as the swirl tends to stand back.

I hope this was somewhat helpful and informative. Until next time—She’s Got Admiral Ackbar Eyes.

Tuesday, May 10, 2016

Star Wars Armada - Regional Recap


The Pittsburgh Regionals from the Perspective of Sixth Place


BiggsIRL did a very good write up of the overall tournament, so this post isn’t about reporting on a loss or even the games exactly (though I did recap below). Instead, I’m just going to talk about the tournament from my point of view and how things went.

First, Mr. Nice Guy Games is an awesome store filled with awesome people. Maybe it’s the years of mental and emotional abuse I’ve suffered playing 40K tournaments, but the Armada community is full of friendly folks. Pittsburgh is no exception. Everyone I played as warm and inviting. This is especially nice, since I’m from Philadelphia and sometimes, our reputation precedes us.

Second, the Pittsburgh meta is the strongest I’ve seen — or read about. I went to this tournament with two friends and met a third on site. We prepped for this event like it was the MCATs. Not just play testing lists, but reading tournament reports from the local and surrounding metas. We discussed what effect of the Steele Open might have as they were both on April 30. We talked through various commanders and how they would play against our lists. I did the best of any of us and came in sixth (the other guys came in 8th and 13th ). To be honest, that includes a few points of luck.

We spent a lot of the tournament staring at our opponent’s board trying to riddle out what they knew and we didn’t. The answer is Rieekan. The Philadelphia meta has developed over the last six or seven months to value killing a ship mid-turn before it activates to win the game. It’s a sound way to play, and honestly, it’s how 40k works. Unfortunately for us, Pittsburgh figured out that Rieekan counters that Ackbar, raider spam, and most other lists built on the kill before activation philosophy.

The result was an eye-opening experience that I wouldn’t trade for anything in the world, including winning that tournament (I’m playing two other regionals and nationals). It’s always the unseen knife that kills you. And we had played around with Rieekan a bit in Philly, but never really grasped what he could do until that day in late April.
To me that’s what regionals are about: learning what exists outside the local bubble. Sometimes that lets you be super dominate and slaughter your opponents. Sometimes it’s the reverse. Either way it helps me feel and understand that I play in a much bigger galaxy than my own backyard.
Third, the tournament software is super buggy. But we all know that from other reports.
Now for the quid pro quo.

Here is the list I used.


My first game was against one of my friends. There were only 16 players and there were 8 first round byes (7 store champs and one natural). I won 7-3. The second game I lost 2-8. It came down to a bad choice I made at the end of turn sixth, which cost me my whale and Ackbar. Then came game three…

I was talking with a gentleman before that game who said he was dropping because he was low enough in the standings that he wouldn’t be in the prizes. I commented that I only had 9 points and the top table was a battle between two players that had earned 18 apiece, but I wanted to play it out. Hey, I’m here, I paid for it, and I’m learning all sorts of Rieekany goodness. I left to hit the head before the start of the round.

I came back to find him standing across the table from me with no ships and an odd smile on his face.

Then the conversation went something like this:

Me: You decided not to drop. Great! Lets do this.
Him: No, I have to go.
Me: Okay?
Him: Intentional draw?
Me: No. I can’t go back to Philly with an intentional draw on my record. (Plus, I don’t agree with that rule’s existence.)
Him: I have to go, so…
Me: We’d better call the TO over.

Long story short, the player had marked drop on his form after round two. The TO asked him to confirm the drop prior to pairings at which time the player decided not to drop. We double checked the rules. I ended up with a 10-0 victory with a 400 point MOV without even setting up.

I realized this was going to skew the standings. The byes resulted in a close points spread. So, I considered what I would want another player to do, and decided to tell everyone what had happened (including my final score), thereby allowing them to adjust their play style accordingly. It only seemed fair under the odd circumstances that everyone be made aware.

I have no idea why he did what he did, and I don’t care. I feel robbed of a game. I would have finished lower in the standings, and I’m okay with that. I was mathematically eliminated from winning the tournament at the end of round two. So, the next time you’re considering dropping be sure either way when you turn in your round scores. We all came to play. No one wants to sit out.

Until next time—She’s Got Admiral Ackbar Eyes.

Tuesday, May 3, 2016

Star Wars Armada - Advanced Gunnery Tactica

Why Advanced Gunnery Is a Fallacy


Even now that gunnery teams supersedes it, most people feel that Advanced Gunnery is an automatic throw away objective. My opponent will never give me this much of an advantage, so I’ll play this effectively blank card and practice my other to missions. Okay, solid logic. That’s how most of us felt in November and December of 2015. By January 2016 the cracks in the edifice were beginning to show. And by February 2016, I’m down right worried if my opponent takes it that his plan is better than mine.

And that’s really what advanced gunnery comes down to: how has and can execute the better plan. Lots of people take this objective, at least in the Philly/South Jersey/DE/Northern Maryland areas. So, everyone has given the objective a lot of thought and has a pretty good idea what do when they play either side.

So, does that mean you shouldn’t make advanced gunnery one of your missions? Probably, unless you have a plan to capitalize on it.

Here are some ways to capitalize on it:


1) Pawn Sacrifice
Taking a Corvette or cheap ship to skew the points advantage offered by advanced gunnery — your ship will most likely run away and stay out of the fight while your opponent now has to sweat bullets that the now 240 point Imperial Class Star Destroyer will cost him the game, because that ship has to survive for him to win

2) Grand Slam Lists
Your list is tailored for neck-punching goodness and giving you a double tap is most likely going to kill ships in a single turn. *cough* Ackbar *cough*

3) Activation Advantage
This lets you choose your moment, so your opponent will suffer more than you for all the extra shooting

4) Fireball Follow Through
Using the squadron command to strip the shields before using this mission to deal a knock out blow

This list begs for certain upgrades to come standard with your list: Leading Shots, X17 Turbolasers, and Pulse Overload are all solid stock choices. But Intel Officers, NK-7 Ion Cannons and Heavy Turbolaser Turrets are also good choices that offer a lot of bang for their buck as you get to shoot the ship a second time. Additionally, tailoring for specific effects can make some often overlooked upgrades economical choices through synergies. For example XX9 Turbolasers don’t see a lot of action in Philly, but add Screed or Dodonna to this list and they make a ton sense.

Also, make sure at least one of your ships does NOT have Gunnery Teams or Slaved Turrets. The recent FAQ states that Gunnery Teams and Slaved Turrets override the objective. So you need to be sure you have some wiggle room when you put this in your list.

Commanders


Darth Vadar / Admiral Ackbar both offer the same advantage: using their abilities to the point of game breaking pain. They only work well on grand slam lists, but who cares? Most ships can’t handle 16 dice, let alone 16 dice with a very reasonable re-roll (I always give Ackbar leading shots). I’ve seen Victories and MC80s melt to punishment this mission and these commanders can dish out.

Screed, while you can only use him once, he offers a safety net for double critical effects in a single activation (one natural and one Screed).

Tarkin is great for a constant re-roll token.

One final note, if you’re taking this list don’t bother with Gunnery Teams. The redundancy should be obvious to most people, but you’d be surprised. If your opponent didn’t take gunnery teams and you did, then you’re really giving them a much bigger advantage than they are giving you.

I hope this was somewhat helpful and informative. Until next time—She’s Got Admiral Ackbar Eyes.

Tuesday, April 26, 2016

Star Wars Armada - Fleet Ambush Tactica

Fleet Ambush


Before I dive into rant, everyone remember when choosing this objective, that the ambush zone is a one foot by two foot block in the center of the board. You measure in from each edge of the setup area, which means two full ruler lengths in from the short sides and three plus five in from each of the long edges (remember that one is larger than two through five when measuring). And your opponent can ONLY PUT ODD DEPLOYMENTS INTO THE AMBUSH AREA. 

Also, this area is measured and marked before obstacles are placed. So, when you place your obstacle make sure you have a plan. I generally like to cluster them together to make getting out of the area a painful experience for my opponent. This is one of the only times, I might not take the space station for my first obstacle deployment, but that choice is dependent on my opponent’s list. 

I find the best choices are a “L” shape or a line on the edge of the ambush area closest to my deployment zone. The line is a good choice against non-swarm lists. Any list with three or fewer ships will find the awkward deployment and obstacle placement difficult without a good amount of practice. The line is will make getting out of the ambush zone painful or prolonged. The goal with that obstacle placement is to help your opening turn or two of shooting. It’s strongest with fighter heavy lists or front firing ISDs. The line can help Ackbar lists as well, but you have to maneuver carefully. The usual swirl pattern can easily lead to a overlap or flying into an trap set by your opponent. 

The L placement makes using that corner problematic because the ship in the ambush zone will most likely have to go over at least one obstacle. This placement offers the added benefit of helping to block ships deployed normally from aiding the strained comrades. 

Either way, your goal by putting this objective into your list is to force your opponent to split his/her forces, and then exploit that split. You need to have a plan that suits your play style ready to go for any list you might encounter. Don’t go into the game assuming you’ll face two Gups or a pair of Raiders. You might end up facing a wave of bombers or pair of ISDs. Likewise, be ready against a small ship swarm. Mothma might dump four ships into the ambush zone with eight fighters and you’ll need to be ready for that eventuality. 

The best plan from a player two perspective relies on threat identification after deployment to gain an activation advantage. Look to make the first kill and then build on the momentum. Ultimately, don’t let yourself get hung up on smaller details, pick the ship you feel is easiest to slaughter without risking one of your ships.

Once the kill is made, you’re opponent will most likely be a little off balance. Losing an activation in Armada is brutal and difficult to recover from. Now, you need to choose your next kill based upon what’s at hand with margin of victory in mind. Sometimes this means throwing dice into your opponent’s fighter ball, sometimes it means chasing down an ISD, and sometimes it means trying to kill two raiders a turn. Regardless, don’t let yourself get cocky. This objective forces your opponent to be vulnerable, and there is no point in taking it if you’re going to overexpose your fleet to similar risks. 

In terms of commanders Ozzel can help with maneuvering. Tarkin and Iblis lend flexibility. But I prefer the murderous approaches of Screed and Ackbar. This objective begs you to run a ship killer list, and you should take this objective with a list that wants to get into the fight fast and hard. That said, fighter balls can do an amazing amount of damage, because your opponent is so close. At speed four, you don’t necessarily need Major Rhymer to put your opponent in firing distance. 

I hope this was somewhat helpful and informative. Until next time—She’s Got Admiral Ackbar Eyes.


Monday, April 25, 2016

Star Wars Armada 3-4 Player Mission

OMG...  this is amazing.  Fantasy Flight Games just released a mission called "Take The Station" intended for 3-4 players.


Per the designers, they were looking for a way to let groups of friends play a "mega battle".  To accomplish this, they made a couple of changes to the way you'd normally play.

The first thing that was changed is the way initiative works.  In a normal game, one player is designated the first player and remains so for the entire game.  In this mission, the initiative token is passed to the left at the end of each turn.  Whoever has the initiative token becomes first player.

The second change is that the objective cards aren't used.  The mission has the station in the center of the board, with each player starting at a corner.  Whoever gets their "objective ship" to the station first gets 50 victory points, with the next getting 40, then 30, etc.  Otherwise, scoring is done as normal.


The final change is that fleet size has been decreased.  Normally, a game is 400 points.  In this mission, each player builds a 150 point fleet without a flagship.  In other words, no Commander upgrades allowed!

I'm really looking forward to this.

Check it out at the below link...

Star Wars Armada - "Take The Station" Multiplayer Mission